
Prerequisites:
- Requires the official WooCommerce shipment tracking plugin to update orders with shipment data
- Requires an up-to-date version of WooCommerce utilizing the WordPress REST API V3
- All products in the WooCommerce catalog must have a unique SKU, including variable items (one SKU per variant)
Integration Functionality (updated 9/24/19)
- Pulls initial items and quantities from WooCommerce into Allocadence (unless a matching SKU already exists)
- Pulls new items from WooCommerce into Allocadence
- Pulls new orders from WooCommerce into Allocadence that are in the “Processing” status
- Pushes updated inventory stock levels from Allocadence to WooCommerce for matching SKUs
- Pushes order status update when completed, shipped, or canceled from Allocadence to WooCommerce
- Pushes shipment data from Allocadence to WooCommerce* (*see prerequisite plugin)
Update interval (maximums):
- All actions: 15 minutes
Configuring the integration
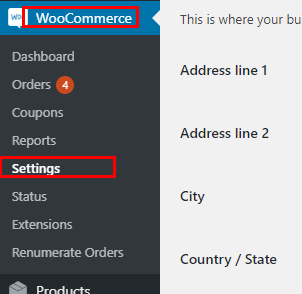
- Login on your WooCommerce site, navigate to the WooCommerce section and open Settings.
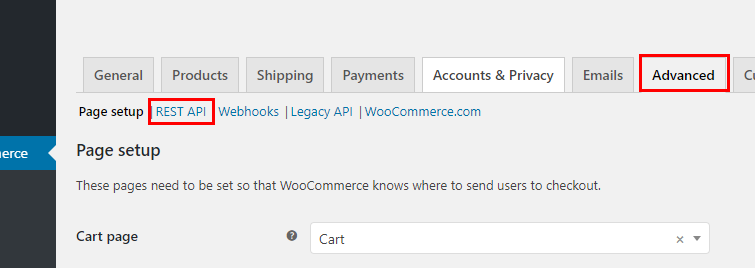
- On the WooCommerce Settings page, select the Advanced tab.
- In the new submenu below the tabs, select REST API.
- Click the button for Add Key. Give the key any description, set the Permissions to Read/Write, and finish by clicking the Generate API key button. Your new keys will be displayed.
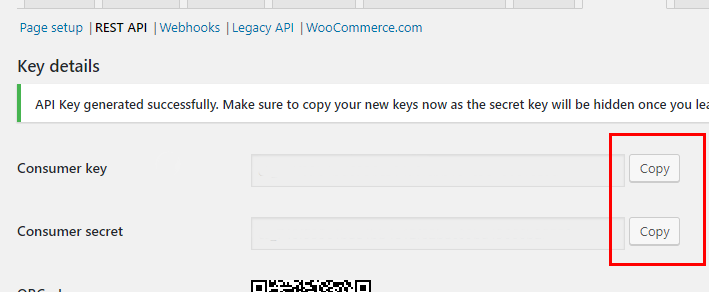
- Keep this tab open, or copy your keys to another safe place before navigating to Allocadence.
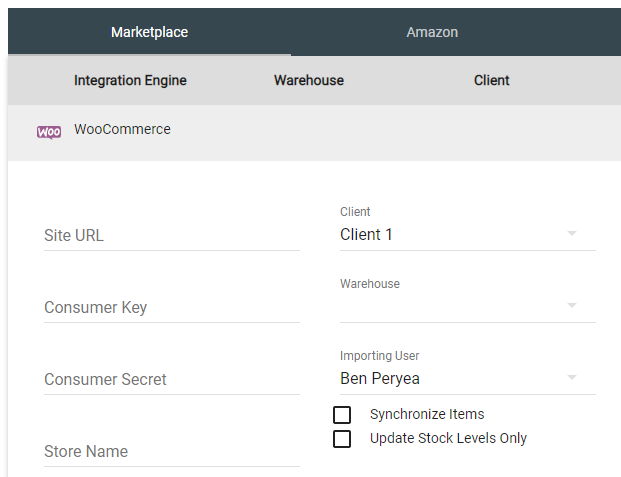
- Login to your Allocadence account and navigate to Admin, select System and then click on the Integration tab.
- Find the Marketplace tab then click on Add Marketplace, select WooCommerce, and hit OK.
- Fill in the details from your WooCommerce site: Enter your WooCommerce site URL, along with your API key and secret code from step #4. Select the appropriate Client (3PL only), Warehouse, and a User for auto-importing of orders. Click Save when finished.
- Option: “Synchronize Items”: This will cause WooCommerce item details to be updated based on changes made in Allocadence. Leave this disabled if you don’t want Allocadence overwriting item details in WooCommerce.
- Option: “Update Stock Levels Only”: This will disable all order management features within the integration, and only update inventory levels from Allocadence to WooCommerce. This is typically used only if you’re using an external platform for order management with Allocadence, such as ShipStation, ShippingEasy, or ShipWorks.
- Once saved, click the “Initialize button” and then “Start“, to begin the Integration.
- Once completed, a new button labeled Actions will display. Clicking it will open the dialog box with Get Orders which will allow you to import any orders that are set to “Processing” in WooCommerce. Note: This will be done automatically every 15 minutes as long as a User is selected in the integration settings.
Product type mappings (WooCommerce -> Allocadence)
- Simple product -> Basic item
- Grouped product -> Only imported to Allocadence if products from the group are selected, in which case we pull in the selected product SKUs rather than the Grouped product SKU.
- Downloadable product -> Dropship item (non-inventory)
- External or affliate product -> Dropship item (non-inventory)
- Variable product -> Basic item (must have a unique SKU per variant)